Thursday 25 December 2014

A Dairy Free Christmas


Merry Christmas to all my loyal followers. It's been fun setting up this blog and I'm happy that I am slowly gaining more followers each week. I've only been doing this since August, so feel free to spread the word!
 
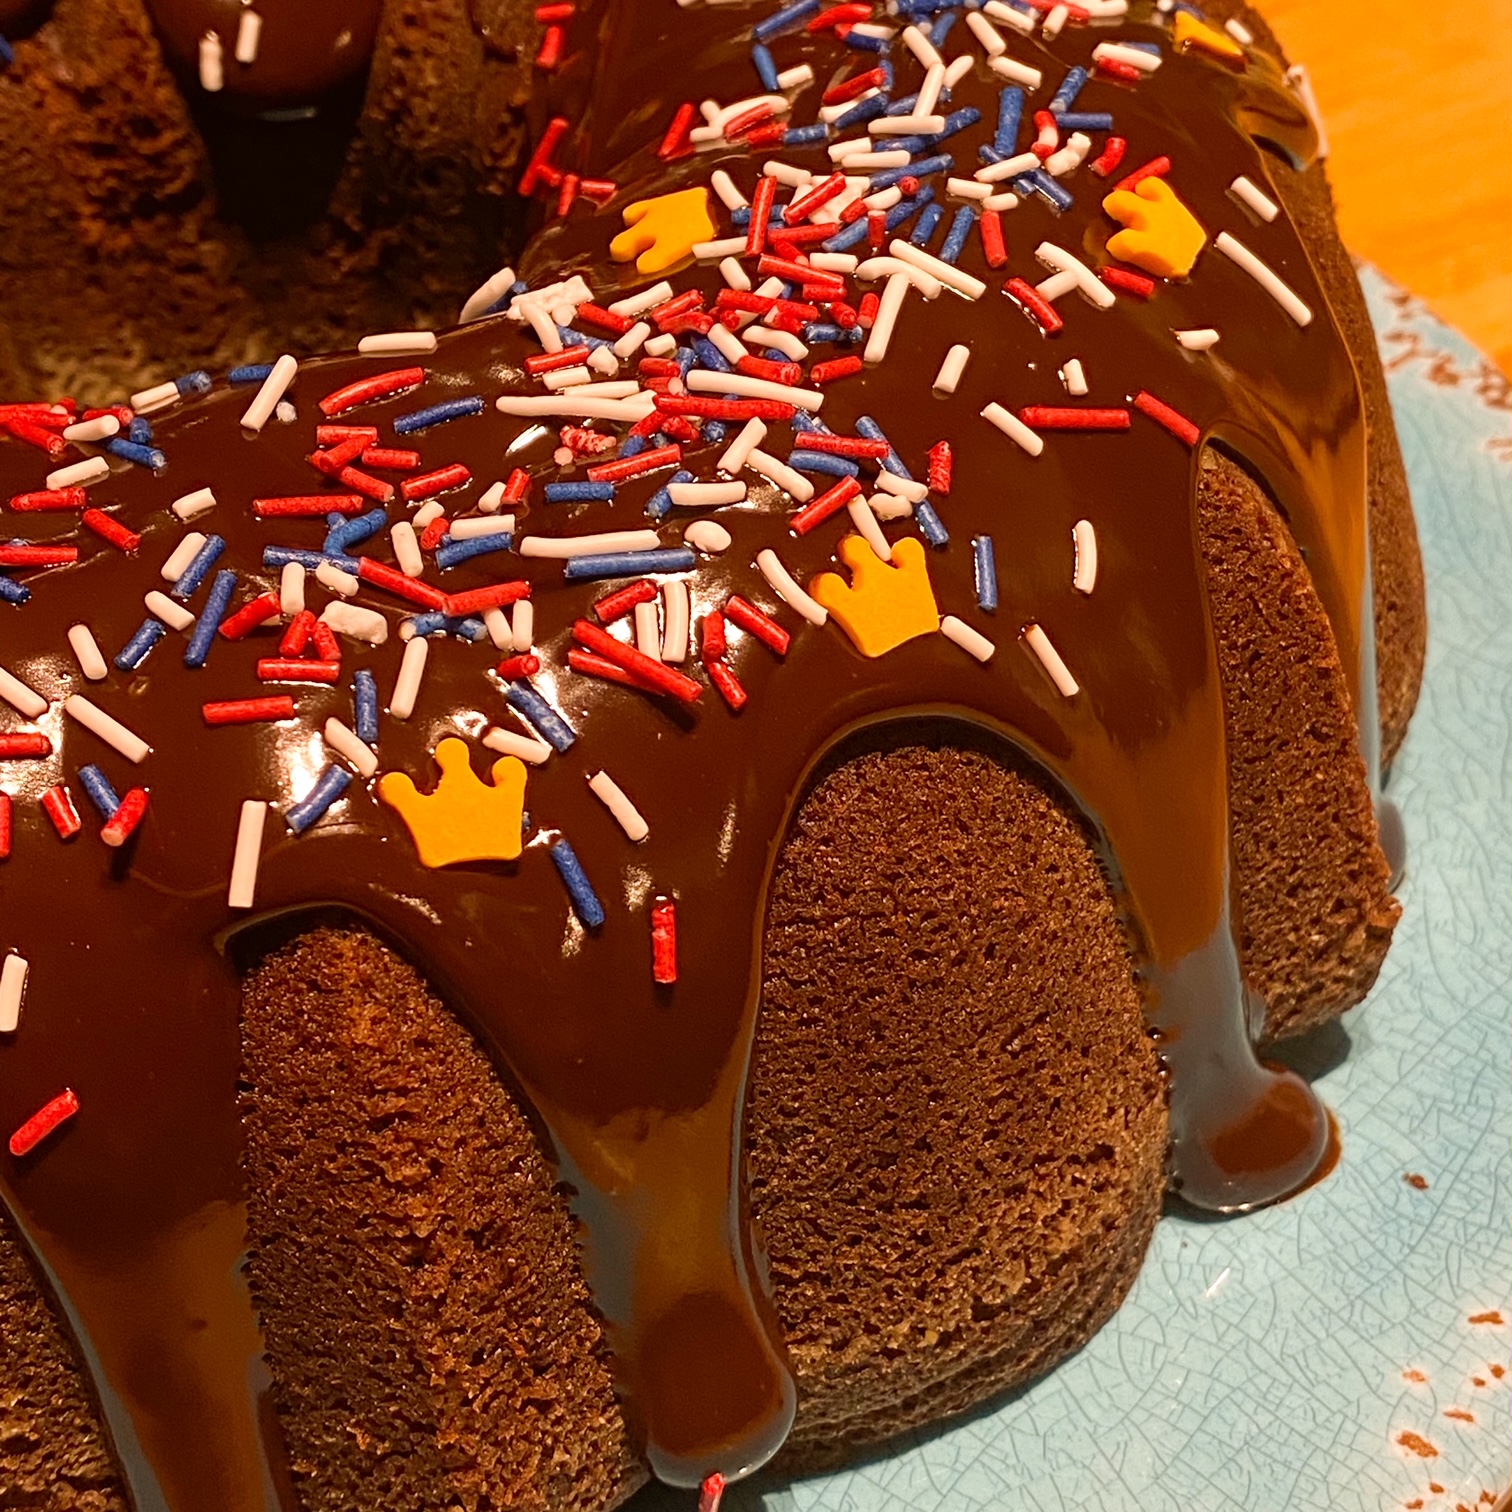
Well, what a lovely Christmas Day we have had. Very relaxed, good food and good company. Today's blog post is for my Chocolate and Coconut Bundt Cake, which I served as our Christmas pudding, since none of us are fans of the traditional mixed fruit pudding.
I took this recipe from Brooklyn Homemaker's Chocolate Peppermint Bundt cake, but since my son doesn't like peppermint, I altered it to a coconut flavour instead. I will admit, I loved the sound of the original, but I love all things mint, so it's to be expected.
 
Anyway, I made some slight adaptions to the recipe to make it dairy free, so I will post it below, but you can click the link above to see the original.
 
Today I used my new NordicWare Heritage Bundt Pan, which I only bought last week. I was so very pleased that the cake came out so cleanly. I just love it!
 
 
 Chocolate Bundt Cake with Dark Chocolate and Coconut Ganache
 
For the Cake:

1 1/4 cups water
3/4 cup cocoa powder
2 1/4 cups sugar
1 1/4 teaspoons salt
2 1/2 teaspoons baking powder(or bi carb soda if using buttermilk)
2 whole eggs
1 egg yolk
1 1/4 cups soya milk (or buttermilk if you can have dairy)
1 cup sunflower oil
1 1/2 teaspoons vanilla extract
2 3/4 cups plain (all-purpose) flour, sifted
 
For the Coconut and Dark Chocolate Ganache:

 200g best quality dark chocolate, chopped (I used Sainsbury's dark cooking chocolate as it is dairy free)
 3/4 cup coconut milk
 Desiccated coconut to sprinkle on top
 
 
1. Place an oven rack in the centre of the oven and preheat to 180 degrees C.
2. Liberally butter and flour a 10 to 12 cup Bundt pan and set aside.
3. Whisk water and cocoa powder in a small saucepan and bring to a boil, whisking frequently. Remove from heat and let come to room temperature.
4. In the bowl of a stand mixer with a whisk attachment, mix together sugar, salt, baking soda, eggs and egg yolk on low for just one minute. Add the milk, oil and vanilla extract and mix on low again for another minute.
5. Add the flour and mix on medium speed for 2 minutes more.  Add the cooled cocoa mixture and mix on medium speed for 3 minutes. The batter will seem quite loose and liquid.  Pour into the prepared cake pan and bake for 55-65, or until a cake tester or toothpick inserted in the cake comes out clean.
6. Let the cake cool completely in the pan and then invert onto a cooling rack. Once cooled I trimmed off the top to make it level once inverted.
7. To make the ganache, heat the coconut milk in a heavy pot, just until it begins to simmer. Remove from the heat and add the chocolate. Let the chocolate melt for a minute or so, then whisk to combine.
8. Drizzle ganache over the cake while it’s still warm and liquid. Sprinkle desiccated coconut over the ganache.
9. Let the ganache set for at least 30 minutes before slicing.
10. We served with hot custard....soooo good!


Thursday 18 December 2014

Candy Cane Crush Marshmallows

 
I have been wanting to try these for about twelve months now after seeing them in a  Donna Hay Christmas magazine. Anyway this year I took the plunge! I have made marshmallow a number of times before so I was quite confident, but I must say these were the best I have ever done, texture wise.
However, a word of warning, they looked great the day I made them and rolled them in the candy canes, but a day later, the candy canes had virtually dissolved, leaving the marshmallows very sticky. I had to do some emergency lathering in the icing sugar/cornflour mix, which was fine, but by the time I gave them to Thomas' teachers, they looked nothing like this!
They still tasted amazing though! I would recommend, making and serving on the same day for the best visual effect.
 
Candy Cane Crush Marshmallows
 
Ingredients for Basic Vanilla Marshmallow
 
1/2 c (125ml) warm water
2 tablespoons gelatine powder
1 1/2 c (330g) caster (superfine) sugar
2/3 c (230g - or 2 tubes if in the UK) liquid glucose
1/2 c (125ml) water, extra
1 vanilla bean, split and seeds scraped (I actually used vanilla bean paste, 1 teaspoon)
 
Icing Sugar Mixture
1 1/2 c (240g) icing sugar, sifted
1/4 c (35g) cornflour (cornstarch), sifted
 
10 medium candy canes, roughly chopped.
 
Method
1. Place the warm water in an electric mixer, sprinkle over the gelatine and stir to combine. Set aside.
2. Place the sugar, glucose and extra water in a medium saucepan over low heat and cook, stirring until the sugar is dissolved.
3. Increase heat to high and bring to the boil. Add a sugar (candy) thermometer and cook, without stirring (for approximately 5-7 minutes), until the temperature reaches 115 degrees C (239deg F) or soft ball stage.
4. With the mixer running on high, gradually add the hot syrup in a thin, steady stream to the gelatine mixture. Add the vanilla seeds and beat for 5-7 minutes or until thick and fluffy.
5. Working quickly, spoon the mixture into a lightly greased 20cm x 30cm tin lined with lightly greased baking parchment (get this ready BEFORE you start making the marshmallow).
6. Using a spatula, smooth the top and cover with lightly greased non-stick baking paper. Refrigerate for 1-2 hours to set.
7. Place the candy canes in a food processor and process until fine crumbs form, set aside.
8. To make the icing sugar mixture, place the icing sugar and cornflour into a bowl and mix to combine. Turn the marshmallow out onto  a surface dusted lightly with some icing sugar mixture.. Dust the knife in the icing sugar mixture and cut into squares.
9. Roll the sides of the squares into the candy cane crumbs.
 
Enjoy these on the day of making if using candy canes. If making plain marshmallows, they will keep in an airtight container dusted with icing sugar mixture, in the fridge for up to a week. Be sure to take your marshmallows out of the fridge just before serving to avoid them going sticky from humidity.


Sunday 14 December 2014

Cranberry Hazelnut Tartlets


My friend made these last night for our craft club and boy, they were absolutely delicious! And I mean, DELICIOUS! I ate 4 in a row and had to restrain myself from eating them all. They were bite sized, after all.


Anyway I am sharing the recipe.....there's a few elements to make, but I promise you, it's worth the effort.

It's taken from Annie's Eats - apparently a great blog, but this is my first time seeing it. I will spend some time checking it out further.

Click here for the recipe.

A perfect recipe for those Christmas parties coming up!

Try it out.
Kris


These frosted cranberries are simply the most beautiful, Christmassy things I have ever made.


Update - Jan 2016
I made these again yesterday for New Year's Eve, so, so delicious and they were a huge hit at the party we went to. I've added a couple of extra photos from this batch into the post. One batch of this recipe makes about 30 tartlets. and the cranberry curd makes A LOT...be prepared for lots of leftover curd to use on icecream!


Thursday 11 December 2014

Christmas Candy Cane Marshmallows


I've just made these tonight to put in the goodie bags for the children in my class tomorrow as they finish for the Christmas holidays. I wanted something super easy, but also something that looked impressive and tasted delicious. These fit the bill.
I bought the cutest mini candy canes from Iced Jems, one of my favourite suppliers. But I crushed normal sized candy canes for the bits. Bits That's a technical term, by the way! One day I'd like to try these with homemade marshmallow but I simply didn't have time tonight.
 
Mini Candy Cane Marshmallows
 
Ingredients:
Store bought marshmallows
mini candy canes
chocolate - melted
crushed candy canes
 
Method:
1. Crush the larger candy canes using a food processor or in a tall glass using the end of a rolling pin like I did.
2. Poke a mini candy cane into each marshmallow.
3. Dip the marshmallow half way into the melted chocolate. Tap off excess.
4. Dip and roll into the crushed candy cane so the chocolate is covered. Place on a plate to set.
 
It's as simple as that!


Tuesday 18 November 2014

Passionfruit Macarons


Basic macaron with passionfruit curd buttercream filling
I hosted a lovely lunch for some good friends last week, for my friend Jen's birthday. It was a good chance for me to do some baking, something I find very relaxing. I wanted to try and avoid chocolate for a change, so decided to go for a little tropical touch.

I whipped up a batch of passionfruit curd, and then made these basic macaron shells using plain icing sugar. I like this macaron recipe so much, it always seems to work for me. I filled them with some curd flavoured buttercream. I had to add LOADS of passionfruit curd to the buttercream to get the flavour and even then it was very subtle, but they were so delicate.

Ready for lunch

Passionfruit Curd

The finished product when I originally made these for my son's teachers.
Here's is a the recipe for the Passionfruit Curd I made last week. I used it in a victoria sponge with a layer of whipped cream on top and also as the filling in some macarons.

And of course there was some left over, so I have had that tonight drizzled over vanilla icecream. Oh my goodness, the MOST delicious dessert. Simple, but goooood.

Passionfruit Curd
 
Ingredients:
  • ⅔ cups (160ml) passionfruit pulp
  • 1 tablespoon lemon juice
  • 165g butter, chopped
  • ¾ cup (200g) caster (superfine) sugar
  • 3 eggs
  • 2 egg yolks
Method:
  1. Place the passionfruit pulp, lemon juice, butter and sugar in a medium saucepan over medium heat and stir until butter is melted and sugar dissolved.
  2. Place eggs and egg yolks in a bowl and whisk until combined. Gradually add the passionfruit mixture, whisking continuously.
  3. Return curd mixture to pan and cook, stirring, over low heat, for 6–7 minutes or until thickened (mine took about 15 mins) and mixture coats the back of a spoon.
  4. Allow to cool and store in the fridge, covered with plastic wrap. Makes 2½ cups.
  5. Store in the refrigerator for up to one week.


Sterilizing the jars and melting the butter, pulp and sugar
 
Thickening up


Getting into the jars prior to working on presentation.

Sunday 16 November 2014

Chocolate Bundt Cake


It's been a while since I blogged some of my recipes properly, so you my be inundated as I have been doing a lot of baking lately. This cake is one I made for my son's 6th birthday yesterday. I wanted something simple, but fun, that I could transport to a restaurant in London (on the train!) So it needed to be robust, but tasty.

This is the second time I have made this cake now, the first being for Halloween last month.


My bundt tins are new, my first from the Nordic Ware range and I've really enjoyed using them. For this type of tin, I think you need a fairly stable cake. This recipe, I have to say, is just delicious. It's a Martha Stewart one, and I know I will use it again and again.


Just a few notes for when you are using this recipe and this style of tin. For the Halloween 'pumpkin' cake, I made two cakes separately, trimmed the tops on both to make them flat and the 'sandwiched' them together with a simple orange buttercream in between. I topped that one with some passionfruit icing. The green 'stalk' is just an icecream cone painted with slightly watered down food colouring - I popped it back into a low temp oven to dry out. This is the 12 cup sized tin.

For the blue birthday cake, I used the smaller tin so I also had spare mixture which I used to make some cupcakes with. I didn't trim the top on this one, just turned it over and let it cool. The icing is just very simple, icing sugar and water and I tried out my new gel colours from ProGel. This was turquoise, although looks sky blue really. Still, it's nice to use the tubes to control the amount you use. You let it dry for a few minutes before sprinkling on the 100s & 1000s. This is the 6 cup sized tin.

This really is a delicious chocolate cake, not too sweet and if making it for a more grown up occasion, drizzling chocolate ganache over the top would be perfect.


Chocolate Bundt Cake

Ingredients:
  •  1 cup (220g) unsalted butter, plus more for pan      
  • 2 1/4 cups (320g) self-raising flour
  • 3/4 cup (75g) unsweetened cocoa powder
  • 1/2 teaspoon salt
  • 1  1/2c (375mls)  milk (or milk alternative)
  • 1 1/2 cups (350g) caster sugar
  • 4 large eggs
  • 1 teaspoon vanilla extract
Method:                 
  1. Make the cake: Preheat oven to 180degrees C. Butter and flour (or use a cake release) a 12-cup Bundt pan.
  2. In a large bowl, sift together flour, cocoa, and salt. 
  3. With an electric mixer on medium-high speed, beat butter and sugar until pale and fluffy, 3 to 5 minutes. Add eggs, 1 at a time, beating well after each addition; add vanilla. If the egg mixture looks like it is having trouble combining properly, you can add a tablespoon of the flour mix to help it come together.
  4. Reduce speed to low; add flour mixture in 2 batches, alternating with the milk and beginning and ending with the flour; beat until just combined.
  5. Transfer batter to prepared pan; smooth top with an offset spatula.
  6. Bake until a cake tester comes out clean, about 50-55 minutes. (40 mins is using the smaller 6 cup tin).
  7. Transfer pan to a wire rack to cool for about 10 mins in the tin, before tipping the cake onto the cooling rack. (Cake can be stored at room temperature, in an air tight container up to 7 days).
Give it a try and let me know if you make the cake!
Kris

UPDATE - May 2023: I quickly make this with King Charles III Coronation sprinkles tonight. Covered in a delicious chocolate ganache made with dark chocolate and Emlie Plant cream. This is just for my family.


Saturday 4 October 2014

Chocolate Mint Cookies


Today I need a quick 'go to' for something to leave my friend while she is babysitting tonight for us. These are so simple, take no time to make and cook and taste really delicious. It's a tried and trusted Nigella recipe.

Chocolate Mint Cookies

Ingredients:
100g soft butter
150g light brown sugar
1 t vanilla extract
1 egg
150g plain flour (all purpose)
35g cocoa powder
1/2 t baking powder
200g dark chocolate chips

For the Glaze
75g icing sugar
1 x 15ml T cocoa, sieved
1.5 x 15ml T boiling water
1/4 t peppermint extract

Method:
1.Preheat oven for 180 degrees.
2. Cream butter and sugar (I use my freestanding mixer), then beat in the vanilla extract and egg.
3. Mix the flour, cocoa and baking powder in a bowl and gradually beat in to the creamed mixture. Finally, fold in the chocolate chips.
4. Using a rounded 15ml tablespoon measure, spoon out scoops of cookie dough (I actually use a small icecream scoop) and place on a  lined baking sheet, leaving a little space between each one.
5. Bake in the oven for 12mins and then let them sit on the baking sheet for a couple of minutes before moving them to a cooling rack, with some baking paper underneath to catch escaping glaze later.
6. Put the glaze ingredients into a saucepan and heat until combined.
7. Using a teaspoon, zigzag the glaze over each cooling cookie.

Makes 26 +.


Tuesday 30 September 2014

Raspberry and Elderflower Sorbet

We enjoyed it for pudding tonight - plenty left for tomorrow too!
It's been a busy few weeks which is why I haven't had anything new on the blog for a couple of weeks. This weekend, my son and I headed up to stay with our friends in Suffolk. They live in the country, with a huge vegetable patch and an abundance of raspberries. I love all the goodies we always come home with and this weekend it was a big container of freshly picked raspberries. Thank you, Anna, for the food and hospitality!
Hand picking the raspberries

What a stash!

I was thinking hard about what I could do with them that would do the lovely flavour justice.
Anyway, I turned to Donna Hay and searched her recipes and found so many choices. I decided on the sorbet as it was so simple and I knew it was something I could easily whip up. Have a look at her original here.

Raspberry and Elderflower Sorbet
 
Ingredients:
 
4 cups (500g) frozen raspberries  
½ cup (125ml) boiling water       
1¼ cups (310ml) elderflower cordial (see tip)  
 
Method:


Monday 15 September 2014

Coconut "Bounty" Macarons

 
I'm on a run with macarons at the moment and I was keen to try some coconut ones - it's one of my most favourite flavours, and I will add coconut to anything I can! In the process of preparing to make ganache to fill them, I thought I would try making it with coconut milk instead of traditional cream. It has made such a light, silky filling, and utterly delicious!
I highly recommend using it as a substitute for cream in a variety of dishes.
 
When thinking about the filling, this is where I planned to add the coconut flavour. So I thought I would try and recreate one of my favourite chocolate bars, the Bounty. I used milk chocolate, some drops of coconut essence and after the coconut milk, I also added some desiccated coconut. Surprisingly, it has a distinct coconut flavour but it's not too overpowering.
Shredded coconut on top as the macarons dried, added texture and colour to the shell.
 
Bounty Macarons (milk chocolate and coconut)
 
 
Ingredients:
 
100 grams ground almonds (I actually use about 110g to then allow for large bits that can't be sieved)
100-110g egg whites (about 3 egg whites)
185g icing (powdered) sugar
4 tablespoons caster sugar

Ganache:
200g milk chocolate, finely chopped
5-6 drops coconut essence
150mls full fat coconut milk
2 Tablespoons of desiccated coconut

 
 Method:
 
  1. Preheat the oven to 140° C.
  2. Push the ground almond through a sieve to get rid of any large pieces or lumps.
  3. Mix the icing sugar and cocoa powder together with the ground almonds in a food processor. I do this twice - sieve, food processor, sieve, food processor.
  4. In a large bowl, whip the egg whites with a hand- or stand mixer. As the egg whites start foaming, add the sugar one tablespoon at a time and continue whipping until the mixture is glossy and stiff. You should be able to hold the bowl upside down without the meringue sliding out.
  5. Fold the dry mix carefully and slowly into the meringue, use a spatula. Don't over mix! You want the mixture to fall off the spatula like lava.
  6. Fill your piping bag and pipe the macarons onto a baking sheet. Sprinkle shredded coconut on top. Carefully tap the baking sheet on a hard surface such as a table to get all the air bubbles out. Let them set for 60 minutes to form a dry skin.
  7. Bake for about 14-16 minutes. Let cool completely, then fill with piped chocolate ganache and sandwich them together.
Ganache:
  1. Finely chop the chocolate. Add the coconut essence.
  2. Heat the coconut milk in a small saucepan on a low to medium heat until it begins to bubble and steam. You want it to be hot enough to melt the chocolate easily.
  3. Pour the coconut milk over the chocolate in a heatproof bowl, stir slightly and allow to sit for a few minutes.
  4. Whisk the chocolate and milk mixture until it becomes smooth and silky. If there are still lumps of chocolate you can place the bowl over a saucepan is simmering water to reheat and melt further. Add the desiccated coconut and stir in.
  5. Pour the melted mixture into a flat pan and place in the fridge to chill. Cover with cling film to avoid a skin forming.
I found the ganache didn't set as much as I has expected so I have reduced the coconut milk measurements slightly for you. I also whipped the ganache up using a hand mixer prior to piping it onto the shells.

Macarons taste best after they have developed their flavours for 24hrs in an airtight container in the fridge. Remove for about an hour prior to serving. Or if you are like me and can't resist, they do still taste good straight form the fridge!!


Sunday 31 August 2014

Chocolate Caramel Macarons


A mouthful of delicate deliciousness


I love macarons - anyone who knows me, knows that. I have been making them for a couple of years now, with mixed results. The thing to always remember with macarons, is that whether they work or not, they always taste good.
I had stopped making them a while ago after a few failed batches - when I say failed, to my super critical eye, they didn't work, but to my loyal taste testers, they were fine! I was convinced my oven was not working well enough for such a delicate treat.
Anyway this week I decided to try a new recipe and see how it went. I must say, I was so thrilled when they turned out perfectly. And taste oh so goooood.

 
I'll show you some of the steps I did to fill the macarons, as I have used a combination of flavours. I made a dark chocolate ganache, which I used on the outside of the filling, and then I used pre-made (gulp!) caramel. I thought about making my own but I love the Carnation Milk caramel. The problem it, it is too runny to use on it's own, so that's why I used the ganache to hold it in. The result is a really lovely combination of flavours, with the gooey caramel being the little surprise inside!


Remember to put your filled macarons into the fridge in a sealed container for 24 hours; this process helps the flavours to develop. Macarons are best eaten after being out of the fridge for about an hour.


Chocolate Caramel Macarons

Makes about 35 whole


Ingredients:
 
100 grams ground almonds (I actually use about 110g to then allow for large bits that can't be sieved)
100-110g egg whites (about 3 egg whites)
15g cocoa powder
185g icing (powdered) sugar
4 tablespoons caster sugar
 

Method:
  1. Preheat the oven to 150° C.
  2. Push the ground almond through a sieve to get rid of any large pieces or lumps.
  3. Mix the icing sugar and cocoa powder together with the ground almonds in a food processor. I do this twice - sieve, food processor, sieve, food processor.
  4. In a large bowl, whip the egg whites with a hand- or stand mixer. As the egg whites start foaming, add the sugar one tablespoon at a time and continue whipping until the mixture is glossy and stiff. You should be able to hold the bowl upside down without the meringue sliding out.
  5. Fold the dry mix carefully and slowly into the meringue, use a spatula. Add food colouring if desired until fully mixed. Don't overmix! You want the mixture to fall off the spatula like lava.
  6. Fill your piping bag and pipe the macarons onto a baking sheet. Let them set for 60 minutes to form a dry skin.
  7. Bake for about 14-16 minutes. Let cool completely, then fill with piped chocolate ganache and caramel and sandwich them together.

Sunday 17 August 2014

Blackberry & Coconut Crumble Cake

Further to my blackberry post the other week, Thomas and I went out foraging again yesterday for more for this recipe. They were so juicy that I think we have caught them just before the season ends.


This is the second time I have made this now and tweaked it to make the base more cakey and fluffier. If you would prefer it more like a slice base, then halve the ingredients for the cake.

I served this up smothered in vanilla bean custard, to friends who came for lunch .... so delicious.

I can't claim this as an original. I took it from Raspberri Cupcakes, a Sydney based blogger I just love. She has based the cake on her mum's old apple cake recipe.

Freshly out of the oven - a lovely golden brown on top.

 I used just half of the crumble in this recipe and froze the rest as I prefer it thinner on top - but I put LOADS of blackberries on the cake mixture - covering the cake really.
The vanilla bean custard just topped it all off. So delicious. We all loved it.


Blackberry & Coconut Crumble Cake

For the cake:
230g self raising (approx. 2 cups plain flour + 4 tsp baking baking powder), sifted
a pinch of salt
120g butter, softened
120g sugar
2 eggs
1 tsp vanilla extract
2 tbsp milk 
1 cup blackberries - fresh or frozen. If using frozen, do not thaw before using. You can use more if you want. I used enough to completely cover my cake mixture.
  1.  Preheat the oven to 180 degrees C.
  2. Cream butter and sugar for the cake until light and creamy.
  3. Add in the egg and vanilla then beat on medium until combined.
  4. Add the flour (and baking powder if using), milk and the salt and beat on low until just combined. Avoid over-beating. The mixture should be a thick-ish paste. I actually added an extra tablespoon of milk to make it slightly wetter and easier to spread. 
  5. Spread the mixture fairly evenly over the base of a square cake tin, lined with baking parchment.
For the crumble:
85g self raising (approx. 1/2 cup plain flour + 1 tsp baking powder)
60g sugar
30 butter
1/2 c desiccated coconut
1 tbsp water for mixing

  1. Put butter, flour (+ baking powder), coconut and sugar in a bowl and rub the mixture between your fingers to combine them. Lift the mixture up high with your hands and let it fall so it traps a bit of air. Gradually add a 1/2 tablespoon of water at a time, while still combining with your fingertips until the mixture starts to form fairly bit clumps of around 0.5 cm diameter, rather than fine breadcrumbs. We added about 1.5 tbsp. water.
  2.  Place your blackberries over the cake mixture in the tin then top with the crumble mixture. As mentioned above, I used half the crumble mixture and froze the rest for the next time.
  3. Bake in the oven for 40 minutes or until a skewer comes out clean and the topping is a golden colour.


Saturday 16 August 2014

Double Chocolate Muffins

I know most people have their favourite chocolate muffin recipe already, but in case you're looking for a new one to try, I highly recommend this one. Taken from 'Call Me Cupcake' it's utterly delicious and very chocolately.

I was watching the catch up to The Great British Bake Off this week, having missed the first show as we were away camping, and I was craving some chocolate muffins. Not sure why, since they were doing other cakes, but anyway.....

I have made these twice this week, the first time following the recipe and using chopped up chocolate throughout and on top.....and the second time I used chocolate chips. Both were lovely, with the chopped up chocolate melting more, but I do like the choc bits!

I substituted the buttermilk for soya milk, but only so my son can eat them. I'm sure it's a lovey richer flavour with the buttermilk.

Oh and in the second batch, I also added about half a cup of desiccated coconut, mainly because I love coconut in everything and I especially liked it in these.


I've also started using the baking cups which I buy from Iced Jems. You can buy here and this link will answer and questions you have about them. I love them!

Double Chocolate Muffins
Makes 12-18 in standard muffin tins, but makes 15-20 in the baking cups.

 Ingredients:
300 g plain  flour
80 g cocoa powder
1 tbsp baking powder
1/2 tsp bi-carb of soda
1/4 tsp salt
250 g granulated sugar
100 g butter, melted
250 ml buttermilk (about 1 cup or 8.45 US fluid ounces)
2 large eggs
150 g dark chocolate (70%), coarsely chopped (or chocolate chips)


Method:

1. Heat oven to 170°c (340F). Prepare a cupcake pan with 12 muffin liners or if using the baking cups, set them up on a baking tray.

2. Mix flour, cocoa powder, baking powder, baking soda, sugar and salt in bowl. Set aside.
3. Mix butter, buttermilk and eggs in a large bowl.
4. Add wet ingredients to dry ingredients and mix until just combined. Stir in chocolate, but save 1/4 of the chocolate to put on top of muffins.
5. Divide batter between 12 liners, filling them completely full or 3/4 full for the baking cups.
6. Sprinkle with remaining chocolate pieces.
7. Bake for 16-18 minutes or until a cake tester comes out almost clean - slightly less time for the baking cups, as they are smaller.