Thursday, 29 January 2015

Black Cherry Pavlova


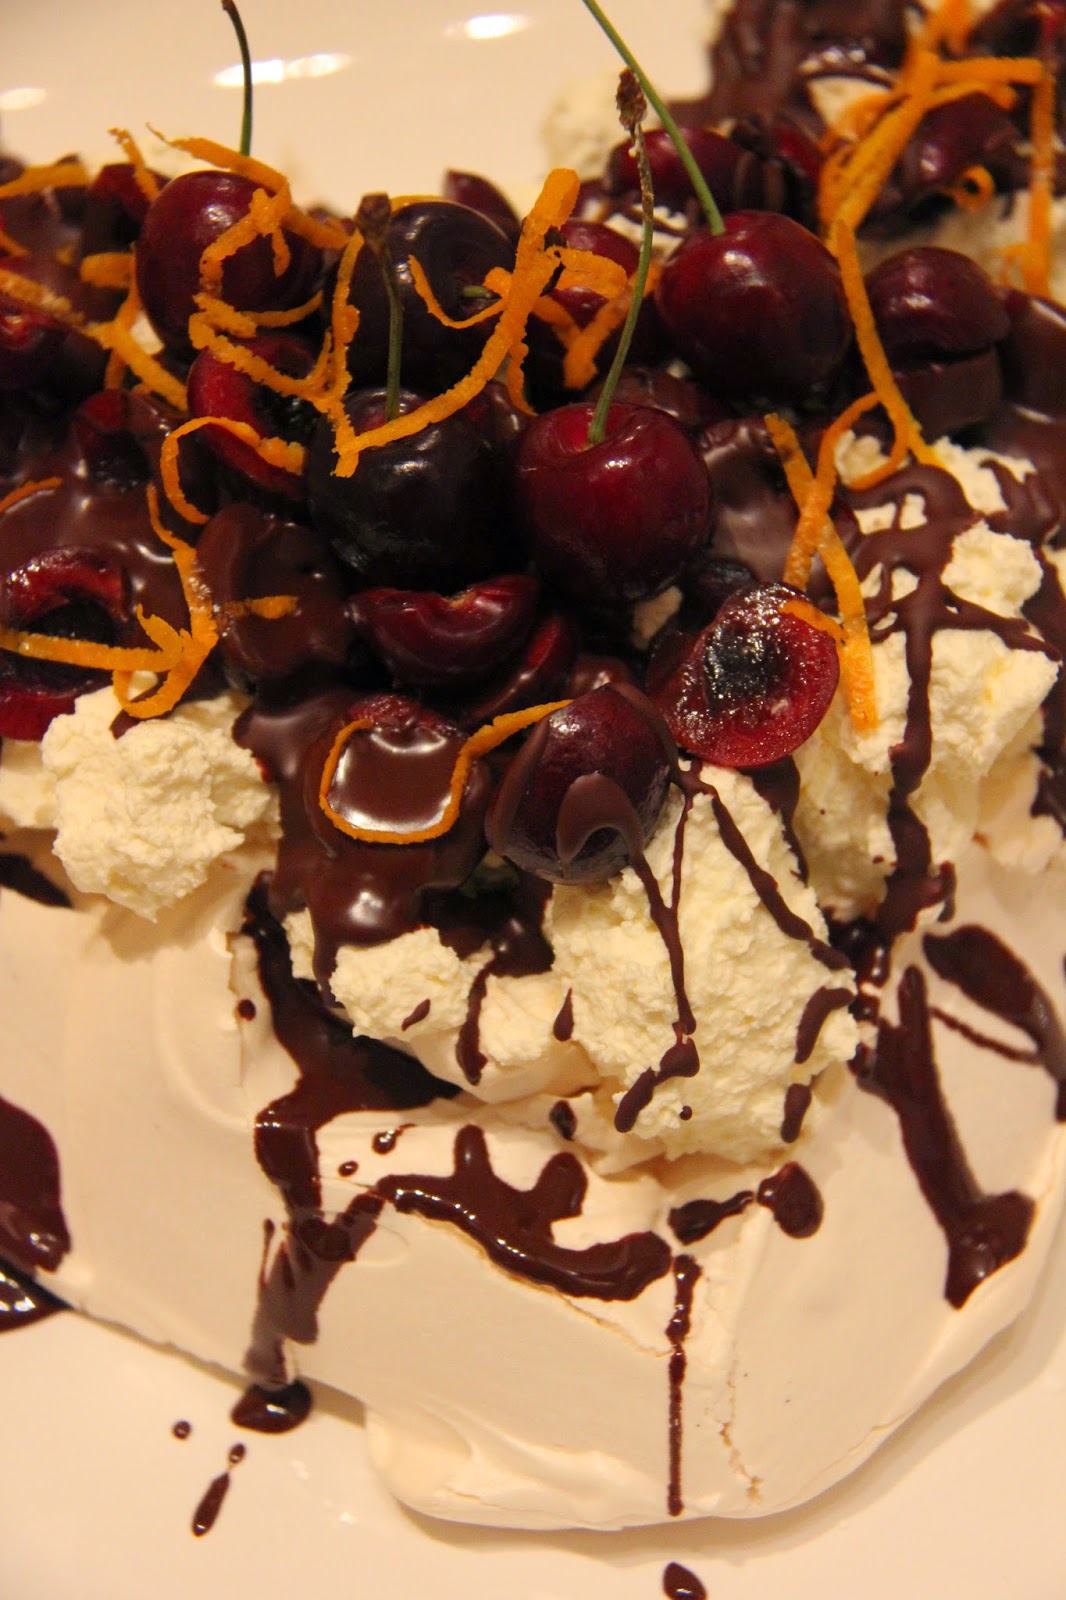
This is the second of my Valentine's Day meringue bakes as part of the Sugar and Crumbs challenge. Once again I used a flavoured icing sugar, this time, Black Cherry. I love cherries. So I thought this would be an easy one to use.
It was very interesting as I didn't love the smell of it, but the beauty of these sugars is the subtle flavours they bring. I added it directly into the meringue to replace the caster sugar and it worked beautifully. The pavlova was topped with whipped cream, fresh cherries, a dark chocolate drizzle and some orange zest. The flavours all worked so nicely together; I did consider making a cherry syrup, but ran out of time.


Whilst my photos aren't great, I hope you can see the heart shape I made my pavlova into. I loved it! The pavlova itself was perfect, crisp on the outside and marshmallowy on the inside.  The fresh cherries complimented the flavoured sugars so well and I would always use fresh with it.


Black Cherry Pavlova
(Pavlova recipe from Raspberri Cupcakes, serves 8)

Ingredients:
  • 4 eggwhites, at room temperature
  • A pinch of salt
  • 240g (about 1 & 1/3 cups) flavoured icing sugar (or caster sugar if making regular pavlova)
  • 1 tbsp cornflour
  • 1 tsp white vinegar
  • 1 vanilla bean, scraped seeds only
  • For dusting: melted butter or vegetable oil + extra cornflour
  • 300ml double cream
  • 100g dark chocolate
  • zest of half an orange
  • cherries to decorate

Method:
  1. Preheat oven to 100°C. Line a large baking tray with baking paper, brush with butter/oil and dust with cornflour.
  2. Whisk eggwhites and a pinch of salt in the bowl of an electric mixer until soft peaks form. With motor running, add sugar, a tablespoon at a time, whisking until sugar dissolves (5-10 minutes, you can check it by pinching a small amount of mixture between your fingers). 
  3. Fold in cornflour, vinegar and vanilla seeds, then pile mixture into a 20cm-diameter circle (or heart shape) on oven tray, gently smoothing top and making a slight indentation. 
  4. Bake in centre of oven until crisp but not coloured (1-1¼ hours). Turn off oven and leave to cool completely with door ajar.
  5. Meringue will keep in an airtight container for up to 4 days.
Topping:
  1. Whip the cream, adding in a few drops of vanilla essence (optional).
  2. Spread it over the pavlova.
  3. Melt the dark chocolate in 30 second increments in the microwave until smooth. Drizzle over the cream. Add cherries to the top - whole and halved.
  4. Top with orange zest.
This is best assembled just before serving.

Sunday, 25 January 2015

Caramel Koala Macarons

 
Happy Australia Day 2015!
To celebrate my national day, even though I don't live there anymore, I have done some Aussie baking. I made some lamingtons (which I will post on here soon) and these little koala macarons. I can't claim to have invented these - they come from one of my favourite Sydney bloggers, Steph at Raspberri Cupcakes. Click the link to see her original ones. I use a slightly different macaron recipe, but by all means try hers out - I used to use it, but found it didn't suit my oven as much as my current one does. This is the second time I have made these - the first time was right at the beginning of my macaron journey and compared to these they looks pretty rough. But the word 'journey' is apt here, as it truly has been a journey to 'perfect' them.

Steph, in her original made the caramel filling, but I always cheat and use the Carnation Condensed Milk ready made Caramel. I simply love it. And combined with the chocolate ganache, it's absolutely delicious, giving a little 'surprise inside' experience.

Piped out and ready to 'rest'.

 
This is not a great photo, but you get the idea of the template I use. I'm not professional enough to get them all consistent without something like this.
 

Caramel Koala Macarons (or Caramello Koala Macarons)

If you are new to macarons, Brave Tart has a lot of good advice on how to make them. I did a lot of reading before I started, and I have made a lot of batches to perfect them. I also did a short course one day to be taught in a practical way. But reading lots of blogs, really does help.

Makes about 20  whole

Ingredients:
 
100 grams ground almonds (I actually use about 110g to then allow for large bits that can't be sieved)
100-110g egg whites (about 3 egg whites)
185g icing (powdered) sugar
4 tablespoons caster sugar
black food colouring
 
Method:
  1. Preheat the oven to 140° C.
  2. Push the ground almond through a sieve to get rid of any large pieces or lumps.
  3. Mix the icing sugar together with the ground almonds in a food processor. I do this twice - sieve, food processor, sieve, food processor.
  4. In a large bowl, whip the egg whites with a hand- or stand mixer. As the egg whites start foaming, add the sugar one tablespoon at a time and continue whipping until the mixture is glossy and stiff - this takes about 9 mins. Add any colour at this stage and mix for a further minute. You should be able to hold the bowl upside down without the meringue sliding out.
  5. Fold the dry mix carefully and slowly into the meringue, use a spatula. You need to ensure the wet and dry ingredients are well incorporated at this stage, and that most of the air has been squashed out. Don't overmix! You want the mixture to fall off the spatula like lava. At this stage I took a couple of spoonfuls out, added a lot of extra black colouring to make the nose and put that into its own piping bag with a very narrow nozzle.
  6. Fill your main piping bag plus a smaller one, narrow nozzle (for the ears) and pipe the macarons onto a baking sheet. I use a template I made up as a guideline under the baking paper - it has the circle for the head and smaller round ears. See photo above.
  7. Tap the tray firmly but carefully a couple of times on a solid surface to let any air bubbles escape. Add the nose to each koala then carefully add the ear decoration. I could only find stars, so I used those.
  8. Let them set for 60 minutes to form a dry skin.
  9. Bake for about 14-16 minutes. Let cool completely, then fill with piped chocolate ganache and caramel and sandwich them together.
  10.  Remember to put your filled macarons into the fridge in a sealed container for 24 hours; this process helps the flavours to develop. Macarons are best eaten after being out of the fridge for about an hour.
Ganache:
  1. Finely chop the chocolate.
  2. Heat the double cream in a small saucepan on a low to medium heat until it begins to bubble and steam. You want it to be hot enough to melt the chocolate easily.
  3. Pour the cream over the chocolate in a heatproof bowl, stir slightly and allow to sit for a few minutes.
  4. Whisk the chocolate and cream mixture until it becomes smooth and silky. If there are still lumps of chocolate you can place the bowl over a saucepan is simmering water to reheat and melt further.
  5. Pour the melted mixture into a flat pan and place in the fridge to chill. Cover with cling film to avoid a skin forming. It is ready to pipe into the macarons when it has set. If it is too hard, leave on your bench for a few minutes, but remember, just by piping it, it will warm up in your hands anyway.
Out of the oven, cooled and decorated. I use a black edible pen to draw the facial features. Ready to fill.
 
I use this caramel, but if you don't have access to it in this form, you can make your own dulce de leche ( recipe here again from Raspberri Cupcakes). My grandma used to make it this way....ooohhhh the memories...)

I pipe a ring of the chocolate ganache first, as the caramel is too runny to hold in on its own.
 

All snuggled up together

 
Cute little fellas, aren't they?
 
Enjoy!

Saturday, 17 January 2015

Pink Lemonade Macarons


"Love is in the Air!" 
I'm really excited to be taking part in a product and blog challenge using Sugar and Crumb's flavoured icing sugars. This one is a Valentine's and meringue theme. I have actually used these products before and I knew they worked well with macarons, as a way of adding flavour to the shell, rather than the filling.

For these macarons, I used the Pink Lemonade icing sugar and a dark chocolate ganache filling. It was a lovely light and fairly subtle flavour. I took them into my work for Friday treats - I'm a teacher by day, and let's face it, teachers love treats, so I knew they would be well received.

I asked for honest opinions on them. These were some of the comments:

"I love getting the flavour in the first mouthful"

"It's subtle, but I like it"

"It almost pops in your mouth!"

"I think a lighter buttercream filling would enhance the favour even more"

"I love it with the chocolate ganache filling, the flavours compliment each other"


Pink Lemonade Macarons
 
If you are new to macarons, Brave Tart has a lot of good advice on how to make them. I did a lot of reading before I started, and I have made a lot of batches to perfect them. I also did a short course one day to be taught in a practical way. But reading lots of blogs, really does help.
 
Ingredients:
 
100 grams ground almonds (I actually use about 110g to then allow for large bits that can't be sieved)
100-110g egg whites (about 3 egg whites)
185g icing (powdered) sugar
4 tablespoons caster sugar

Ganache:
200g dark chocolate, finely chopped
150mls double cream

 Method:
 Preheat the oven to 140° C.
  1. Push the ground almond through a sieve to get rid of any large pieces or lumps.
  2. Mix the flavoured icing sugar together with the ground almonds in a food processor. I do this twice - sieve, food processor, sieve, food processor.
  3. In a large bowl, whip the egg whites with a hand- or stand mixer. As the egg whites start foaming, add the sugar one tablespoon at a time and continue whipping until the mixture is glossy and stiff - this takes about 9 mins. Add any colour at this stage and mix for a further minute. You should be able to hold the bowl upside down without the meringue sliding out.
  4. Fold the dry mix carefully and slowly into the meringue, use a spatula. Don't over mix! You want the mixture to fall off the spatula like lava.
  5. Fill your piping bag and pipe the macarons onto a baking sheet. Carefully tap the baking sheet on a hard surface such as a table to get all the air bubbles out.  Add the heart decorations to the top of each macaron. Let them set for 60 minutes to form a dry skin.
  6. Bake for about 14-16 minutes. Let cool completely, then fill with piped chocolate ganache and sandwich them together.
  7. Place in an airtight container in the fridge for 24 hours to let the flavours develop.
Ganache:
  1. Finely chop the chocolate.
  2. Heat the double cream in a small saucepan on a low to medium heat until it begins to bubble and steam. You want it to be hot enough to melt the chocolate easily.
  3. Pour the cream over the chocolate in a heatproof bowl, stir slightly and allow to sit for a few minutes.
  4. Whisk the chocolate and cream mixture until it becomes smooth and silky. If there are still lumps of chocolate you can place the bowl over a saucepan is simmering water to reheat and melt further.
  5. Pour the melted mixture into a flat pan and place in the fridge to chill. Cover with cling film to avoid a skin forming. It is ready to pipe into the macarons when it has set. If it is too hard, leave on your bench for a few minutes, but remember, just by piping it, it will warm up in your hands anyway.


You can get these icing sugars direct through the Sugar and Crumbs shop, or I have also bought them through Iced Jems.  There are a number of retailers in Australia who are stocking them now too (even one in Canberra!). Click here to search for your local stockist.
 
I'd love to know your thoughts.....
 
Kris


Sunday, 11 January 2015

Marshmallow Coconut Funfetti Cake


I have been asked to blog this recipe after I added it as my profile picture on facebook...it was such a fun cake to make and I was so excited with how well it turned out. I took the idea from Donna Hay in one of her children's magazines, but changed it slightly to suit my tins and purpose. This was made as one of my entries into my work 'Great British Bake Off' style competition. This one didn't place - not sure why as I thought it was fab! Hehehe....My chocolate orange macarons came second though!
 
One of the things I love about making marshmallow is the transformation from a nothing kind of substance, to pure white fluffy marshmallow within minutes. It's remarkable!
 
Anyway, the original recipe makes this as one big cake, but I did it as two mini cakes instead as I have some great little springform tins that I wanted to use. I'll write it up as one large cake, but do adjust and feel free to play around with sizes like I did.
 
Note: This is a different method to making marshmallow than I have used in other recipes and it makes a slightly softer marshmallow, much better for cutting through and serving (and there is no need for a candy thermometer!)
 
 
Marshmallow Coconut Funfetti Cake
 
Ingredients:
2 tablespoons desiccated coconut
1 1/2 cups (330g) caster sugar - superfine sugar
1 1/2 cups (375ml) water
3 teaspoons gelatine powder
2 teaspoons vanilla extract
1/2 teaspoon coconut extract
pink food colouring
 
Biscuit base
150g plain biscuits - I used rich tea, but any plain or shortbread biscuit will do (actually if you used a chocolate biscuit you would get a Neapolitan look with the layers!) 
60g unsalted butter, melted
2 tablespoons coloured sprinkles
 
Method:
1. Line the base and sides of a lighted greased 20cm springform tin with non-stick baking paper and set aside.
2. To make the biscuit base, place the biscuits in a food processor and process until the mixture resembles coarse breadcrumbs. Add the butter and process until combined.
3. Stir through the sprinkles, and using the back of a spoon, press the mixture over the base of the prepared tin. Refrigerate for 30 mins or until firm.
4. Lightly grease the lined sides of the tin and sprinkle generously with the coconut. Refrigerate until ready to use.
5. Place the sugar, water, gelatine and vanilla in a medium saucepan over medium heat and cook, stirring, until the sugar is dissolved. Bring to the boil and cook for 4-5 mins. Allow to cool completely.
6. Place the cooled mixture and coconut essence in an electric mixer and whisk for 5-6 minutes or until thick and fluffy.
7. Spoon half the marshmallow mixture into the prepared tin and spread evenly.
8. Add a few drops of pink food colouring (start lightly -you can always add more) and whisk until well combined. Spoon over the first marshmallow layer and spread evenly.
9. Refrigerate for 1-2 hours until set. Carefully remove from the tin and serve.
 
10. For the sprinkles on top, you have two choices. Add them before refrigerating and they will stick well, but will go soft and not be crunchy when serving - still tastes good though. Or wait until just before serving and you will add some nice crunchy texture to this cake.
 
TIP: This cake can be kept refrigerated overnight.
 
You can see my macarons in the background too!


Sliced!


Tuesday, 6 January 2015

Chocolate Marshmallow Slice


This is one of my all time favourite recipes and one I can make quickly. I got the original recipe from my very dear, dear Aunt, who was my most favourite person in the whole world, and more like a mother to me than an aunt. I have tweaked it slightly, but the basics are the same. I think of her every single time I make this, when I refer to the recipe I typed up about at her house about 24 years ago.

It's a such a popular slice and I urge you to have a go and make it.


Chocolate and Marshmallow Slice

Ingredients:
Base
1/c caster sugar
1 c desiccated coconut
1 c self raising flour
2 dessert spoons cocoa
125g butter, melted - by the way I used Stork block and made it dairy free for my son.

Topping
1 large bag of marshmallows (I use Sainsbury's family sized bag)
Extra coconut to sprinkle of top

(Note: you could use homemade marshmallow which would be even nicer, but not as fast)

Method:
1. Pre-heat the oven to 180deg C, and grease and line a 20cmx20cm tray with baking parchment.
2. Combine the dry ingredients in a medium bowl.
3. Add the melted butter and mix to combine all ingredients - the mix will be like wet sand.
4. Press this into the tray - I roll over the mix with small glass tuned on its side to compact it.
5. Bake for 15 mins. Remove from oven and roll the glass over it again to flatten the base as it does rise slightly.
6. Once the base is out of the oven, put all the marshmallows into a bowl and melt in the microwave in 30 second increments. Check after each 30 seconds. Once melted, move quickly to pour on top of the warm chocolate base. The marshmallow starts to set quickly, so work fast. Using an oiled spatula will help. Don't worry if you don't use every bit of marshmallow - just use as much as will come out quickly.
7. Quickly sprinkle with coconut then cover and refrigerate for an hour or more to set.
8. When cutting this up, move it on to a board and peel the sides away. I have a bag of icing sugar/cornflour mix that I use for coating marshmallows, and I dip my knife into this, which helps to cut without sticking, but before I had this, I used to dip the knife in a glass of water and then cut - it helped.

This can be stored in an airtight container in or out of the fridge for up to a week - if it lasts that long.

Variations:
You can also top this with chocolate icing and coconut, a traditional Australian slice.

Thursday, 1 January 2015

Snowman Marshmallow


So the other thing I took to my NYE party was this snowman marshmallow for the kids to enjoy. I love making marshmallow and this is something I want to work more on this year and experiment with various flavours and styles etc. I've never made one like this before but I had bought the snowman mould from Sainsburys the other week in their after Christmas sale. It was pretty simple once I'd worked out how to add the details.
 
I used my basic marshmallow recipe which you can find here.
 
I prepared the mould first, greasing it up with spray oil - this is essential so the marshmallow can release at the end.
I then added the details. I used candy melts, and went with the colours I had. If you don't have colours you could ether colour white chocolate or just use normal chocolate to do it. Let the chocolate set before you do any of the marshmallow.
 
Once the marshmallow is made you must move quickly to get it into the mould before it sets. Smooth the top and then cover with greased baking paper and set in the fridge for an hour or two.
 
Once you remove it from the fridge, generously sprinkle with the icing sugar/cornflour mix and tip it onto a board. Sprinkle the top and sides with the power too. I used a (clean) paintbrush to them dust the sugar off the coloured bits.
 
I had some left over marshmallow, which I had anticipated, so I just put that into a greased and lined square tin, and I have cut that into squares and rolled in desiccated coconut. I absolutely love the marshmallow/coconut combination - one of my favourite flavours ever!


Ginger Snap and Caramel Tartlets - NO BAKING NEEDED


Welcome to 2015 and my first post for the new year. Today I'll post how to make some of the little bite sized tartlets I took to my friend's NYE party last night.

These are so simple to make and take literally about 6 minutes. They are perfect for a last minute dish to take and really yummy as a party dessert. I was reminded of this recipe from my friend Chrissie in Australia, she whipped them up after lunch one day while we were visiting and it took me back to many years ago when I used to make them, well before I had my baking 'bug'.


Gingersnap and Caramel Tartlets

Ingredients:
1 x packet of gingersnap biscuits (ginger nut in Australia)
1 x tin of Condensed Milk Caramel
whipped double cream
chocolate shavings

Method:
1. Preheat the oven to about 150 deg C. Place the biscuits into a fairy cake tin - one per hole. (Muffin tins are too big for this, making the smaller cupcake/fairy cake tins ideal).
2. Put the tray into the oven for 4 mins. Be careful, These will burn very quickly if left - set a timer and stay close!
3. Remove from oven and quickly use the back of a dessert spoon to make an indent in the middle, pushing down and rounding if off to make it into a bowl shape. Put them all onto a cooling rack to cool and harden.
4. Once cooled, put a teaspoon of caramel mix into each tartlet, top with whipped cream and chocolate shavings. I piped the cream as it looks a big nicer, but otherwise spoon it on. I also made the chocolate shavings using a vegetable peeler on the side of the block. Very easy.

Enjoy!
So simple.