Monday 26 December 2016

Christmas - Chocolate Steamed Pudding


Merry Christmas to you all!

It's been one of my most relaxing Christmases to date - we always have fairly low key days anyway, but this year I planned to cook the food very differently and it made a huge difference.

As is traditional in our house, for Christmas dinner, we have roast lamb and all the trimmings (roast potatoes, roasted sweet potato and carrots, broccoli and pigs in blankets).

This year, I decided to try and cook the roast lamb in my new Instant Pot - which is the most amazing electric pressure cooker. I did two half legs of lamb so they would fit, rather than a full leg.

Oh my goodness, it literally fell off the bone it was so succulent and tender. By cooking it in the IP, it freed up my oven for the vegetables and sausages -  gone was all the juggling I normally do to get it all cooked at the same time. THIS is what made all the difference for a stress free Christmas dinner.

Anyway, for pudding this year I really wanted to try something in the pot. I was enticed in by a Donna Hay video on facebook for her chocolate pudding which she boils for hours. It just looked soooo good. In our family we aren't fans of the traditional Christmas pudding full of fruit, so I knew this would be an ideal alternative, yet still feel very Christmassy.


Click here for the original recipe.


I'm going to add the recipe to my page with the instructions for cooking it in the Instant Pot pressure cooker. By the way, if you have never heard of the Instant Pot - google it and check it out, and my recommendation: GO AND BUY ONE!! I absolutely love it!

Chocolate Christmas Pudding
From: Donna Hay
Serves 8

Ingredients:
  • 1 cup dried dates
  • 1 teaspoon bi-carb (baking) soda
  • 3/4 cup (180mls) boiling water
  • 55g unsalted butter, chopped and softened
  • 1 teaspoon vanilla
  • 3/4 cup (135g) brown sugar
  • 4 eggs
  • 3/4 cup (110g) self raising flour, sifted
  • 1/4 cup (25g) cocoa powder, sifted
  • 100g dark chocolate, melted
For the sauce
  • 3/4 cup (180mls) single (pouring) cream - I used the same amount of coconut milk from the tin - mostly solids, but heated to become liquid to suit my milk-allergic son)
  • 200g dark chocolate, chopped
  • 1/2 cup (60g) brown sugar
  • 25g unsalted butter

Method:
  1. Mix the bi-carb and water together, and place into a food processor with the dates. Allow to soak for 10 minutes and then process until they form a smooth-ish paste.
  2.  Place the butter, sugar and vanilla into an electric mixer and beat for 5 mins until well combined. Add in the eggs, one at a time, mixing well after each one. You may need to add a spoonful of flour to help it come together.
  3. Add the flour, cocoa, chocolate and date mixture and beat well.
  4. Pour into a lightly greased 7-cup capacity (1.75L) pudding bowl. ***  Cover tightly and tie down with string, or use a lidded bowl if you can.
  5. Place the pudding onto the trivet in the Instant Pot, and fill with boiling water until it is about 5cm below the rim of the bowl. Close the lid and put it on STEAM for 20 mins. Once that time has ended, turn it off, and then put in on MANUAL (high pressure) for 25 mins. Let it do a natural pressure release (NPR) for 20 mins.
  6. Remove from the Instant Pot and allow to sit for 5-10 mins. Depending on your bowl, you may be able to turn it upside down and it comes straight out, or you may need to run a knife gently around the edge first. I use a lidded plastic bowl and it came out very easily on its own.
  7. To make the sauce, place all the ingredients into a saucepan and stir over a low heat until everything is melted and the mixture is smooth. Pour over the pudding and serve.
  8. I topped with sugared cranberries which I had made the night before and stored in an airtight container.
*** My pudding basin is only 1.2L big, so I filled it to about 4/5 full to allow for rising, and with the left over mixture I poured in into cupcake wrappers and cooked in the oven at 180 degrees for about 15 mins. Totally yummy!


Merry Christmas everyone, and a happy New Year to you too.
Kris x


Saturday 19 November 2016

Birthday Month = Cake!


It's been a busy birthday week in our house this week. We had cake on my son's actual birthday, shared with a couple of friends who live in our street and then today he had a small group of his close friends come round for a movie and pizza afternoon.
It was a lovely, relatively calm afternoon, where they watched The Secret Life of Pets - have you seen it? It's quite fun and cleverly made.
They made their own pizzas half way through, choosing their own toppings. They ranged from ham, pepperoni and corn (my son's - he's allergic to cheese, so none for him!) to olives, and anchovies. The kids loved making their own, and certainly gives them a sense of accomplishment.


I always use Jamie Oliver's basic bread recipe for my pizza dough - I made enough for 5 small children's sized pizzas, and two larger adult ones for my husband and I later on. It's so simple to make and because you only have to prove once, it's relatively fast too! After the first prove, you knock it back, divide it, and then roll out for the pizzas and cook straight away.

After dinner the children had a chocolate fondue, dipping in strawberries, raspberries, banana and marshmallows. A huge hit and lots of fun - am I naughty sending them home full of sugar?

And of course, a birthday isn't a birthday without the cake! I used my trusty chocolate bundt cake, our family favourite and the second one I have made this week! You can find the recipe here!


This was my first one of the week - my son chose the tin he wanted - he loves my Nordic Ware ones as much as I do!
He was also lucky enough to be given a fabulous wooden spoon for his birthday too - I won it in a competition through Lanky Cow and was able to choose what I had put on it. They do the most amazing range of wooden products such as chopping boards which can all be personalised.


A view from the top....

And side top.....


Happy 8th Birthday, Thomas!


Monday 17 October 2016

Chocolate Indulgence Cake


I have loved making this cake. It's an 18th Birthday cake for our neighbour, my son's babysitter, and one of the loveliest boys ...ahem, men, we know!

His mum asked me to make something chocolately, so this is a double layer chocolate cake, with oreo buttercream in between the layers and on the outside, with a chocolate ganache drip and loaded with maltesers and crispy m&ms.


Chocolate Indulgence Cake

Ingredients:

For the cake:
2 cups self raising flour (300g)
2 cups caster sugar (460g)
3/4 cup cocoa (90g)
1 teaspoon bi-carb soda (baking soda)
1/2 teaspoon salt
1 teaspoon coffee powder
1 cup milk (250ml)
1/2 cup sunflower oil (125ml)
2 eggs
2 teaspoons vanilla extract (10ml)
1 cup boiling water (250ml)

For the frosting:
250 g softened butter
500g icing sugar
1 pack oreo biscuits - crushed in a food processor
2 Tablespoons milk (30ml)
1 teaspoon vanilla extract

Method:

For the cake:
1. Preheat the oven to 180C (350F) and line the base of two 20cm (8 inch) loose bottomed cake tins.
2. Add flour, sugar, cocoa, bi-carb soda, coffee powder and salt and mix together in a large bowl or the bowl of a stand mixer.
3. Whisk together to combine fully.
4. Add milk, vegetable oil, eggs, and vanilla to the flour mixture. Mix on a medium speed until fully combined. Carefully add the boiling water, and mix on high speed for 1 minute to add air to the mixture.
5. Split the mixture evenly between the two cake tins and bake for 35-40 mins or until a skewer comes out clean.
6. Leave the cakes in the tins for 20 mins and then turn out into wire racks to cool fully.
7. Trim the tops of the cakes to even them up (if necessary).

For the frosting:
1. Mix the butter, vanilla and icing sugar in a large bowl until the buttercream is silky. Add the milk to loosen it up. Mix in the crushed oreos.
2. Use some of the buttercream between the cake layers and then do a layer to crumb coat the cake. Chill in the fridge for 30 mins or until set.
3. Add another layer of the oreo buttercream to the cake, smoothing the sides.
4. Decorate as you wish. I added a ganache drip and then layered maltesers and crispy M&Ms on top and around the bottom.

It's a very indulgent cake, but for a chocolate lover, perfect!

Oh, and HAPPY BIRTHDAY BEN!


Tuesday 20 September 2016

Raspberry Icecream - No Churn


After the success of my first no churn ice cream (passionfruit and mango), I thought I'd have another go with a different fruit. I had been to a 'pick your own' farm last week and got a huge stash of strawberries and raspberries to make jam, and I had some left over raspberries.

So here is my raspberry no churn ice cream! It's very rich, so a scoop or two at a times is plenty.


Raspberry Ice Cream
Ingredients:
1 x 397g tin condensed milk
500ml (2 cups) double cream
300g raspberries (fresh or frozen)

Method:

1. Warm the raspberries up in a small saucepan to soften and release the juices. Then mix in a blender/food processor to make a puree.
2. Place the condensed milk and raspberry puree in a bowl and mix until well combined.
3. Whip the cream until soft peaks form. Gently fold it into the raspberry mixture until there are no streaks remaining.
4. Pour into a loaf pan and cover in cling film. Refrigerate for 4 hours.
5. To serve, let it stand in room temperate for a few minutes so it is soft enough to scoop.

It's as simple as that!


NOTE: You can use most fruits to make this ice cream. The last one I used 1 ripe mango (puree'd) and the flesh of 2 ripe passionfruit. It was amazing, will definitely make that one again!

Wednesday 20 July 2016

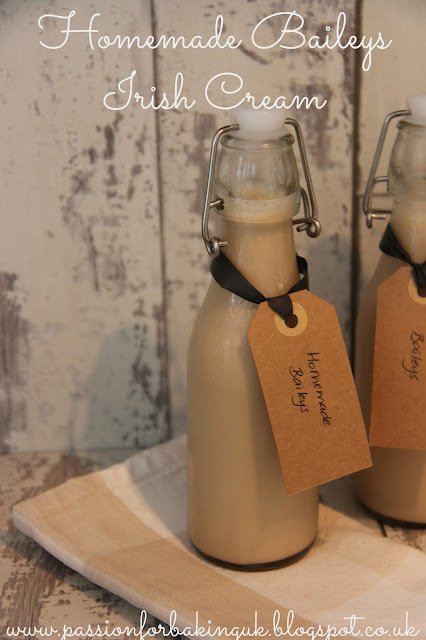
Homemade Baileys Irish Cream


It's that time of the year again....end of the school year, 'Teacher Present Time'! My son is leaving his school at the end of this week, and moving up to Juniors. Over the last 4 years I have added something homemade into each gift time, at Christmas and end of year. They have ranged from macarons, biscuit tin selection, hot fudge sauce (that was a winner!), marshmallows, passionfruit curd and a few other bits and pieces.

This year I did booze. Who doesn't love a boozy gift? I've been wanting to make this Baileys Irish Cream for a while now. I got the idea from Lucy over at Bake. Play. Smile, a fabulous Aussie food blogger. You can link straight to her recipe, or I will add it below.

Beware: this has a bit of a kick to it. To make it less potent, reduce the amount of whisky.


Homemade Baileys Irish Cream
Taken from Bake.Play.Smile

Ingredients:

375ml (1 2/3 c) Irish or Scotch Whisky
397g tin of condensed milk
250 ml (1 cup) double cream
1 tsp vanilla extract
1 tsp instant coffee powder/granules
3 Tbsp chocolate sauce

Method:

1. Combine all the ingredients into the jug of a multispeed blender. Turn to medium to high speed for 20 seconds until all ingredients have combined.
If the cream starts to curdle slightly, reduce the speed and gradually build up again. Alternatively, if it has curdled, strain the liquid through a sieve, allow the strained mixture to settle and remove the froth from the top.
2. Pour into sterilised bottles, seal and store in the fridge.
3. This can stay in the fridge unopened (as if!) for two months.

Note: 
  • I bought some chocolate sauce from Marks & Spencer but you could any ice cream sauce. 
  • This makes about 1 litre of Baileys.
  • I originally made this with double cream but when tasting it over the weekend, my sister-in-law and I decided it was a bit too thick, so I thought about changing to single cream. However after talking with another friend who DID use single cream, she said it was too thin. So my final conclusion is....keep it double, shake it before pouring and drink over ice, which as it melts will thin it slightly.


Enjoy over crushed ice or poured over vanilla icecream.


Sunday 5 June 2016

Koala Macaron Vanilla Yoghurt Cake


My lovely friends, Sarah and Lee are having a baby very soon and yesterday was their baby shower. I wanted to make two things, a cake that reminds them of their Australian roots, and a nappy cake full of essential goodies for a newborn baby.

This is the story of the Koala Macaron Cake....and perhaps a mention of the nappy cake too!


I was looking for a different vanilla cake to use for this cake. I wanted one with some good structure and considered making a madeira cake - one of my all time favourites and a good one for layering. But instead, I decided to try one I had been hearing about recently, from a fellow food blogger, Jo from Every Nook & Cranny.  Jo's Vanilla Yoghurt Cake turned out to be one of the most delicious vanilla cakes I have eaten. I made double the mixture to get four layers, but only used three, which left a whole layer for my husband and I to gorge on! We ate it plain, no deorations....and it was sooooo yummy!

The macarons are one of my favourites to make. I haven't made any macs for ages, but it's like learning to ride, once you have the technique you always remember it. I was really happy with how they turned out. I won't repeat the process for making them here, but if you'd like to give them a go, you can find the recipe here.

I filled half of them with a chocolate ganache and caramel combination and the rest I left plain to go around the cake. I needed 15 for the bottom of the cake - I had originally miscalculated 12, so I had to prise open 3 extra filled macarons to complete the circle!
 

I love this condensed milk caramel so, so much. And I have been known to eat it straight out of the tin with a spoon. On more than one occasion. :)

Anyway I made the macarons on Thursday night - they can be made in advanced, in fact they are better if made in advance and stored in an airtight container in the fridge.

On Friday night I made the vanilla and yoghurt cake. As I said, I doubled the recipe to get the height I wanted, but I will give you the original recipe here. I believe Jo has adapted her original recipe now, which I didn't realise so here is the original and here is the updated version.

Vanilla Yoghurt Cake

Ingredients:
Cake
150g butter, softened
200g caster sugar
125g plain flour
250g self-raising flour
1/2 tsp baking powder
1/4 tsp bi-carb soda (baking soda)
3 large eggs
2 tsp vanilla extract
250g greek yoghurt

Buttercream
250g butter, softened
500g icing sugar, sifted
2-3 Tablespoons milk to loosen the mixture
1 tsp vanilla essence

Ganache
100g dark chocolate
80ml double cream

Condensed milk caramel for filling.

Method:

1. Preheat the oven to 160 deg C and then line the bases of 2 x 20cm sandwich tins with baking parchment.
2. Cream the butter and sugar until light and fluffy - this will take about 10 minutes so that it is very pale. This adds essential air into the mixture. Sift the flours, baking powder and bi-carb of soda together into another bowl
3. Add the eggs, one at a time into the mixture, beating well after each one. Adding a spoonful of the flour mixture helps prevent curdling.
4. Once all the eggs are incorporated, add the rest of the flour and mix gently until it is all just combined.
5. Pour in the yoghurt and vanilla and mix slowly until it forms a batter consistency.
6. Gently measure equal amounts into the two tins, flatten it out very carefully and then cook for 30-35 mins. Check they are cooked by lightly touching the top- it should spring back. You can also insert a probe - if it comes out clean your cake is cooked.
7. Remove cakes from the oven and allow to cool slightly in the tins. Tip out onto a baking rack to cool completely.

8. While the cakes are cooling, make the buttercream by combining the softened butter and icing sugar in an electric mixer until it is light and fluffy. Add the vanilla essence and milk as required to make it a soft buttercream.
9. Once the cakes are cooked, layer buttercream between the layers - I also added a drizzle of condensed milk caramel to each layer too. Next time I would add more - a full layer of the caramel.
10. Once filled, I did a crumb coat on the outside and the refrigerated it for an hour or over night (I do most of my baking at night time!)
11. To complete the cake I made another amount of the buttercream and iced the outside. Keep a small amount of buttercream left over to use as 'glue' to stick the macarons on with.
12. Make the ganache by finely chopping the chocolate and placing it into a heat proof bowl. Warm the cream up in a small saucepan over a medium heat until it is bubbling but not boiling. Pour it over the chocolate, mix gently and leave it to melt for a few minutes.
13. Mix to combine the chocolate and cream. If there are any lumps left, put a small amount of water in the saucepan, heat it on the hob/stove and place the heat proof bowl over the top and stir until the remaining lumps of chocolate have melted. If the ganache is looking quite thick and not drizzly enough, you can add a small amount of cream to it at this stage to thin it down a bit more.
14. Put the ganache into a piping bag with a small nozzle or just snip the end off the piping bag (small hole) and drizzle the ganache around the edge first to create the drip effect. Then fill the top.
15. Add the macarons to the top and set into the ganache. Then using the left over buttercream, place a small amount on the back of the plain koala macarons and stick them around the bottom.
16. Put the cake in the fridge to set everything well.
17. Serve and enjoy!

Notes: I am not actually a huge fan of buttercream (it's too sweet for me) so if I was making this for a more casual occasion, I would just fill it with jam and whipped cream.


And to finish off, here is the completely different cake I made this weekend! This nappy cake is full of nappies (obviously) plus all sorts of other goodies and essentials for the arrival of a newborn baby.


With the very happy 'Mums-to-Be'! Not long now, girls!


Monday 30 May 2016

Chocolate Mousse and Strawberry Cake


I saw a similar cake to this recently and wanted to give it a go, but adapted to suit the dietary needs in our family. So I have used all my own recipes to make it suitable. It's actually very easy to make, there's just a few steps to it, but none of it is difficult.
There is a brownie base, filled with strawberries and chocolate mousse, topped with chocolate ganache and strawberries.


Of course, if you have your own normal mousse recipe, you could substitute it in here, but for this one, I have made it dairy free. It's a recipe I have made often, usually in this recipe here.


Chocolate Mousse and Strawberry Cake

Ingredients:

Brownie Base
*(this makes enough for this base, and an extra tin of brownies)
200g butter
200g dark chocolate
3 eggs
250g light brown or caster sugar
100g self raising flour
25g cocoa
125g dark chocolate chips

500g strawberries

Chocolate Mousse
400g dark chocolate
2 x tin coconut milk - chilled in the fridge, use the solids only
1 tablespoon icing sugar

Ganache
200g dark chocolate
1 x tin coconut milk - solids only

Method:
Brownie base
Preheat the oven to 180 degrees C and grease and line a 20 cm springform tin (base only) and a small square tin for the extra mixture.
Melt the butter and chocolate over a pan of simmering water. Take off the heat once melted and stir until smooth. Whisk the sugar and eggs together and add the chocolate. Stir in the flour, cocoa and chocolate chips.
Pour half the mixture into the round tin, and the remaining into the square tin.
Bake in the oven for 35 mins (round tin) and 40 mins (square tin).
Remove from the oven and allow to cool in the tin.

Strawberries
Slice the tops off the strawberries to make a flat top. Slice enough in half to line the outside edge of the brownie base. The rest will stay whole to fill the tin.

Chocolate Mousse
Chop the chocolate into small pieces and melt in the microwave, in 30 sec bursts, stirring until smooth.
Remove the solids only from the tins of coconut milk and place into a bowl with the icing sugar. Using a hand held electric mixer, whip until light and fluffy. Pour in the melted chocolate and mix gently until all combined. If you over mix, you will cool it too much and it will start to set. This can be easily fixed by putting the bowl in the microwave for 10 secs to melt it slightly. Mix again by hand.
Place a few spoonfuls of the mousse in the round tin on top of the brownie base and then arrange the cut strawberries around the edge. This thin layer of mousse will help stop the strawberries from making the base too soft.
Pour the remaining mousse mixture over the strawberries making sure it gets into all the crevices between the strawberries. An alternative is to pipe the mousse on, but I found if the mousse is a bit runnier, it is easier to just pour and then tap the tin on the bench to help the mousse fill the spaces.
Chill in the fridge until set, about 30 mins.

Ganache
Chop the chocolate finely and place into a bowl. Heat the solids and a dribble of the liquid from the tin of coconut milk, in a small saucepan until simmering but not boiling. Pour over the chopped chocolate, stir slightly and then leave to melt. After a few minutes, stir until smooth and glossy.
Pour half over the top of the mousse so it is smooth and then return to the fridge to set, about 30 minutes. The rest can be kept in an airtight container to reuse.
(You could, of course, also use the remaining ganache like a fondue and dip in marshmallows, strawberries, raspberries etc). We may or may not have done that last night!

Top with strawberries.

Remove it all from the fridge for about an 45 mins before serving to allow the mousse to soften slightly.


Enjoy!


Sunday 20 March 2016

Easter Bunny Cake


I love Easter and the baking possibilities. As you will have seen, when it comes to seasonal baking I rarely have any sophistication, instead going for the cute and fun. This cake is no exception. I got the idea from the Stork website and have added my own twist with the surprise inside.

The first time I made this recipe, I then split the mixture into 4 tins and they came out very thin. I decided to use them to make the mini bunnies - I got two!


I then made the cakes again, this time doubling the recipe to get 4 decent sized layers as you can see above and below.

To add even more interest I also coloured each layer a slightly different shade of pink to create the ombre effect. 

With a cute marshmallow tail and nose, fondant eyes and chocolate ears and mouth, here you have a gorgeous Easter Bunny cake!
All of this was made for my son and his friends for their Easter craft session this morning.

If you would like a video and original recipe, click here to go to the Stork site. For the sake of having the cake recipe easily accessible, I will post it here as well. For all the extra details, it's worth heading to their site.

Easter Bunny Cake
 (Note: I doubled this recipe to get these 4 thick layers)

CAKE:
  • 225 g butter, softened
  • 185g caster sugar
  • 4 eggs, large
  • 1 tsp vanilla extract
  • 225g self raising flour ( or 220g plain flour and 1tsp baking powder)


VANILLA FROSTING:
  • 175 butter, softened
  • 500g icing sugar (powdered sugar)
  • 1 tsp vanilla extract
  • 1 tbsp cooled boiled water
* you may need more than this if filling all the layers as well.


TO DECORATE:

  • 100g white chocolate
  • pink sprinkles (or I used a few drops of pink colouring in a bag with some sugar and massaged the colour in and used that)
  • white ready to roll icing
  • pink and white marshmallows
  • 10g dark chocolate, melted - for the eyes, mouth and nose
  • 80g dark chocolate, melted - for the ears.


METHOD:

  1. Grease and line 4 x 20cm (8 inch) sandwich tins with baking paper on the base.
  2. Preheat the oven to 180 c/160 c fan/Gas mark 4.
  3. Cream together the butter and sugar until pale and fluffy.
  4. Add in eggs, one at a time, mixing fully after each one. Add vanilla.
  5. Fold in the flour.
  6. Divide the mixture into 4 equal amounts - I use a large ice cream scoop to ensure even quantities.
  7. Add a small amount of colour to each bowl, increasing the amount of colour each time until you achieve the desired colour.
  8. Bake two cakes at a time, for 25 mins. test and leave for a couple more mins if needed. 
  9. Remove from oven and turn out on to a cooling rack until cool.

For the rest of the decorating, follow the instructions (& the ear template is also available) on the Stork site.


Don't forget the tail!


Happy Easter everyone!


Tuesday 8 March 2016

Easter Vanilla Cupcakes and Doughnuts


On the subject of baking up a storm, these were the other bakes I did today, preparing for the school charity bake sale. I actually rarely make cupcakes as I find it so hard to find a reliable and delicious recipes. But this time, I sought help from the home baking experts on a baking facebook page I am a member of. One member, Teresa came back with her favourite so I gave it a go....and it was DELICIOUS! The mixture was substantial, so I made a dozen cupcakes and the rest I used to make baked mini doughnuts.


Vanilla Cupcakes

Makes 2 dozen

Ingredients:
  • 200g butter, softened
  • 1 3/4 c caster sugar
  • 2 tsp vanilla bean paste
  • 2 3/4 c self raising flour
  • 1 c milk
  • 2 eggs
Method:
  1. Preheat oven to 180 deg C and line muffin tray with cases.
  2. Cream butter, sugar and vanilla bean paste with an electric mixer until pale and fluffy.
  3. Add the eggs one at a time, beating each one until well combined.
  4. Add flour and milk in alternate batches, mixing with a wooden spoon until well combined.
  5. Spoon mixture into the cases and bake for 15-20 minutes or until cooked through.
  6. Remove from oven and set aside to cool completely.
  7. Decorate with buttercream and Easter themes marshmallows and sprinkles.
Note: this will make 2 dozen cupcakes, or you can make 1 dozen and use the rest to make the doughnuts below.


Vanilla Doughnuts

Using the same recipe as above, put the mixture into a large piping bag and snip off the end. Pipe the mixture into a doughnut pan that has been greased with cake release spray. This is important or they will stick.

Bake in the oven for about 12-15 minutes, but do check them after 10 mins.

Once cooled, remove from the pan and dip into a basic glaze to coat. Add sprinkles and decorations.

Glaze:
Add sifted icing sugar to a bowl (approx 2 cups), pour in about a tablespoon of water to start with. Stir to combine, adding more water as necessary to produce a fairly runny glaze. If it is too thick the doughnuts will fall apart while you dip them.
Dip the rounded side of the doughnut into the glaze to coat. Decorate.


Creme Egg Bundt Cake


I baked up a storm in the kitchen today, making goodies to sell at the Year 6 Bake Sale tomorrow. We do one annually to raise money for charity and as I organise it, it's only fair that I contribute. This year I was tossing up what to make, but in the end I went for an Easter theme. You can see the other Easter bakes here.

Last year I made this same cake, it's my 'go to' chocolate bundt cake; my absolute favourite! This year I made the icing white (yellow last year and I just couldn't get past the brown/yellow combo which I have always disliked!) and it is soooo much nicer. A simple icing sugar/water glaze, a few chopped Cadbury's Creme Eggs on top and away we go!


I won't write out the whole recipe again, but if you want it, you can find the cake recipe here.

I let it cool in the tin for about 20 mins before inverting onto a rack and allowing to cool. Once cool, I sliced the uneven top off to give a flat bottom.

I didn't measure the icing, I simple sifted an amount of icing sugar, added some water, slowly so it doesn't get too runny and then poured it over the top. I used 3 large creme eggs, cut in half, and dotted a few of the smaller ones in between. It was really so simple.


I love the filling oozing out......


This cake keeps fresh in an airtight container for at least a week (if it lasts that long!)

Notes:
  • I always use a cake release spray when using bundt tins, and the cakes come out perfectly, ever single time.
  • When cutting the creme eggs, don't worry if they are uneven, broken and oozing filling, it all adds to the charm.


Happy Easter!


Monday 7 March 2016

Easter Bunny Bark


I love Easter baking, perhaps even more than Christmas. Last year I made a white chocolate bark, but I wanted to try dark chocolate this year. My first attempt, with 70% chocolate didn't really work. It was my first attempt at tempering chocolate and I think I melted it too fast and it bloomed. This is where the cocoa butter separates and has a 'white' appearance. In addition, I think the chocolate was just too dark for children to eat. So, this time I went back to my favourite baking chocolate, it's Sainsburys Belgium Dark Cooking Chocolate. It's so nice to work with, and appeals to all tastes when eating.

I have been collecting all the Easter chocs; Cadbury's mini eggs, Smarties mini eggs, Sainsbury's micro mini eggs, Cadbury's Hoppy Bunny bar, Maltesers Bunnies and the Wilton Easter sprinkles, ready for this project. It's sooo tempting to sneak a few!


It's pretty simple to make bark. You melt the chocolate, slowly, trust me, pour it onto a tray lined with parchment paper, add the decorations and then refrigerate to set. After it had hardened, break it up and package it into bags to give as gifts.

If you would like to temper the chocolate to give it that 'crack' as you break it, the BBC Good Food guide to tempering chocolate is really good.


Good luck and happy 'barking'!