Sunday, 15 November 2015

Cherry Ripe Slice

Cherry Ripes are probably my all time favourite chocolate bar and an Australian institution. If I had a ready and easy supply of the real thing I'm not sure I would make this, however, as they are hard to come by over here in the UK I thought I would look for a way to make them myself. If you have no idea what I am talking about, let me explain, Cherry Ripes are a dark chocolate dipped bar, filled with chopped glacé cherries and coconut filling. I'm not a great fan of glacé cherries, but in this, they are perfect and you simply can't substitute for fresh cherries.

There are a few variations to this recipe online, so I had a look through them all to find one that suited me. Most have a chocolate slice base, and look really nice, but I wanted to have no base so I could make some dipped in chocolate (see below), like the proper bar, and some in a slice form like this above.


This is a no bake recipe, super easy and totally delicious!

What will I change? I'll add more cherries next time, and less condensed milk. The original recipe called for copher (a uniquely Australian product), but I substituted with coconut oil. It was fine with that, and I would say much healthier.

Without further ado, here is the recipe (with adjustments to suit my changes):

Cherry Ripe Slice

Ingredients:

150-200g glacé cherries, chopped (depends on how full of cherries you would like the slice)
250g desiccated coconut
300g sweetened condensed milk
1 teaspoon vanilla essence
115g coconut oil, melted (or copher if available)
few drops pink food colouring until desired colouring
200g dark chocolate, melted

Method:

Line a large 20 x 30cm tray with aluminium foil.
Put condensed milk, vanilla, coconut oil and food colouring into a large bowl. Mix to combine. The oil will stay separate at this stage but will change soon.
Add cherries and coconut, mix well and if desired, add a few more drops of food colouring.
Spoon mixture into the tray and spread out evenly and carefully. I put just under half into a smaller tray to make into the dipped bars, but if you'd prefer the slice, put it all in the tray, it will just be thicker than mine.
Smooth the top with an offset spatula and chill in the fridge for an hour or freezer for 30 mins.

For the slice, once chilled, pour the chocolate over the top, smooth it out and chill in the fridge for a couple of hours or overnight. To slice it up, bring it out of the fridge for about 20 mins before cutting to avoid the chocolate cracking.

For the dipped bars, slice the coconut and cherry mixture into 4cm x 4cm squares, and dip into the melted chocolate, coating all sides. Tap off excess chocolate and then place on to a tray lined with baking paper. Allow to set and harden.

Best kept in the fridge.

Makes 20+ pieces.


Sunday, 8 November 2015

Star Wars themed 7th Birthday


This week, is my son's 7th birthday. He is Star Wars mad...and I mean mad for it! My husband thinks he could enter the TV show 'Mastermind', and he's probably correct. Anyway, it was a simple choice for the theme for his party. I knew I had to keep it all simple, as it's also a busy time for me, work wise this month.

Anyway I found some ideas on Pinterest, most completely unachievable for me, some do-able. I love the idea of the Storm Trooper marshmallows, and after making ghosts for Halloween, I knew I could this easily. It just took white marshmallows, cake pop sticks and an edible black pen - all of which I had!


We had bought some Star Wars cookie cutters from Lakeland, and I used the Darth Vader & Storm Trooper ones to make some chocolate biscuits for the take home 'party bag'. I also put in the marshmallow pop, for a tasty goodie bag.

I use Sweetopolita's Dark Chocolate Sugar Cookie recipe for my biscuits. It's a really delicious biscuit, although quite a soft dough, so it needs a lot of chilling, between every stage.


I also used some cupcake wrappers, also from Lakeland, and instead of cupcakes, I made some chocolate crackles for the party.


Chocolate Crackles
Makes about 24

4-5 cups of rice krispies (rice bubbles)
1/2 cup desiccated coconut
1 c mini marshmallows
200g melted chocolate - I like to use Sainsbury's dark chocolate cooking chocolate

Mix all together until coated by the melted chocolate and then spoon into the wrappers. Chill in the fridge for 20 minutes.

Can be stored at room temperature in an airtight container for up to a week.


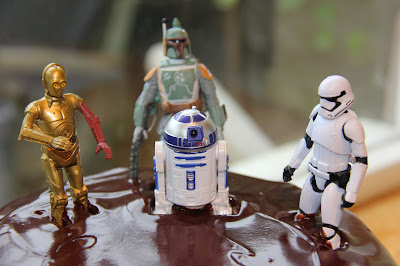
And now for the cake. These stress me out as I am NOT a good cake decorator and I am nervous and pretty hopeless with fondant covered cakes. I tried to come up with simple ideas and even bought some black and white fondant, but in the end I went for buttercream and ganache and used small Star Wars figures as decorations. They looked like they were playing 'Stuck in the Mud' (cake), and the bonus was my son had some new toys to play with afterwards! I thought the cake looked great.

I've made this cake recipe before, but in a Bundt tin, so this time I split the mixture into 3 x 8 inch tins and cooked them each for 23 minutes on 180deg C and layered them with homemade raspberry jam in the middle. I much prefer this to buttercream between the layers.

The ganache on top is my favourite kind - dark chocolate and coconut milk instead of normal cow's cream.

Coconut Milk Ganache
(Dairy free, but without a strong coconut flavour)

200g dark chocolate
1/3 c coconut milk - mainly solid, and a touch of the liquid.

Chop the chocolate into small pieces and place in an heatproof bowl. Gently heat the milk until it is hot but not quite boiling and pour over the chocolate. Mix and then leave until the chocolate has melted.
Mix until it is smooth and silky. Cool and pour onto the cake and use a offset spatula to spread and drip off the edges of the cake.

Any left over ganache is DELICIOUS on top of vanilla icecream.


Good luck and May the Force be with You!


Monday, 2 November 2015

Halloween Oreo Spider Cake


I love Halloween! We didn't celebrate it at all as kids in Australia, and I think even now it's pretty low key, but here in the UK it's bigger and I am loving it. To be honest, we didn't do much for it before we had our son, but for me, having kids is a good excuse to get into it!

Each year now, we hold a party at our place for the kids in our street (and sometimes a few extra friends). It's so much fun, a few games, some fun food and then out trick or treating! The kids get super excited, all dressed up and gorging on sweeties and chocolate.

I love all the baking for the party, with my cake always a centre piece. So, this year I decided to make this Oreo Spider Cake - I had found the idea on Pinterest and adapted it to suit my recipes.


I reuse my cake bunting each year. I painstakingly made it a couple of years ago, cutting all the tiny triangles and sewing the letters together with needle and thread. It's super cute!


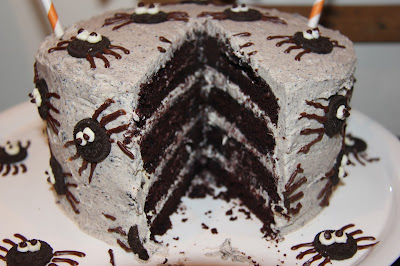
 So, basically, this is a chocolate cake with an oreo buttercream inside and out. This cake recipe is a real favourite and one portion of the recipe made all four layers; it's huge! The spiders are made from mini oreos and I piped on some plain buttercream for the eyes. The legs and middle of the eyes are made with a chocolate ganache. More about my ganache later!


The cake itself is not overly sweet, but be warned, the oreo and buttercream combo more than makes up for it...good though!

Oreo Spider Cake
  • Servings: 15-20
For the Cake:

1 1/4 cups water
3/4 cup cocoa powder
2 1/4 cups sugar
1 teaspoons salt
2 1/2 teaspoons bi carb soda (baking soda)
2 whole eggs
1 egg yolk
1 1/4 cups buttermilk
1 cup sunflower oil - or a similar neutral oil
1 1/2 teaspoons vanilla extract
2 3/4 cups plain (all-purpose) flour, sifted

1. Place an oven rack in the centre of the oven and preheat to 180 degrees C.
2. Line 4 x 20cm pans with baking parchment on the bottoms only.
3. Whisk water and cocoa powder in a small saucepan and bring to a boil, whisking frequently. Remove from heat and let come to room temperature.
4. In the bowl of a stand mixer with a whisk attachment, mix together sugar, salt, baking soda, eggs and egg yolk on low for just one minute. Add the milk, oil and vanilla extract and mix on low again for another minute.
5. Add the flour and mix on medium speed for 2 minutes more.  Add the cooled cocoa mixture and mix on medium speed for 3 minutes. The batter will seem quite loose and liquid.  Pour evenly into the prepared cake pans and cook for 25 mins , or until a cake tester or toothpick inserted in the cake comes out clean. 
6. Let the cake cool for about 10 mins in the pan and then invert onto a cooling rack. Once cooled you can trim off any uneven tops to make it level, or just leave it as I did this time.

For the Oreo Buttercream:
I have to now admit I cheated here, and used tubs of Betty Crocker ready made vanilla buttercream. (Shocking, I know! LOL) I almost always use this, as my son is allergic to cow's milk and these tubs are dairy free, and I am yet to find a dairy free 'butter' that makes a buttercream as nice as the real thing. Anyway we like this buttercream and it's easy to use. But it is an expensive way to do it.
(You can, of course, use your usual buttercream recipe, but do keep some aside for the eyes and crumb coat before you add the oreos).

3.5 tubs of vanilla buttercream style frosting
1 x packet of oreo biscuits, crushed

I crushed the biscuits and then mixed them with 3 tubs of buttercream (although I didn't quite use all of it).
The remaining tub I kept plain to use as the spider eyes and for the crumb coat.

Use half the oreo buttercream in between the layers of the cake. Then use the plain buttercream to make a crumb coat. If you have never crumb coated before, check out this video for a quick tutorial.
Chill your coated cake in the fridge for at least 30 mins. I left mine in overnight as I was working in the evening.

Use the remaining oreo buttercream to cover the cake completely.

For the Dark Chocolate Ganache:

200g best quality dark chocolate, chopped (I used Sainsbury's dark cooking chocolate as it is dairy free and I simply like it)
1/cup (125ml) coconut milk (from the tin)

To make the ganache, heat the coconut milk in a heavy pot, just until it begins to simmer. Remove from the heat and add it to the chopped chocolate. Let the chocolate melt for a a few minutes or so, then mix to combine. 
Leave the ganache to cool down and thicken.

For the Spiders
10-12 mini oreos
Ganache (see above)
buttercream eyes (see above)

Separate the mini oreos and scrape out the filling. Pipe on the eyes and leave to dry overnight.
Stick the spiders onto the cake and then pipe the ganache legs on each spider.

Store in an airtight container - this will stay fresh for about 10 days, if you can resist it for that long!

Notes:
The ganache recipe makes FAR more than you will need, so you can reduce it all, but it is such an utterly delicious recipe (and no strong coconut flavour really) so we use to dip fruit in, over icecream etc, so it's worth having a bigger batch! And dairy free- so a real bonus!