Monday, 27 July 2015

Chocolate and Zucchini Bread


I've been wanting to bake with zucchini (courgette) for a long time now and have been looking at some recipes, but this week one came up in my fb newsfeed that was just too irresistible to pass up.


Looking back over my recent bakes, I have realised just how much chocolate features and I feel I need to explain myself. Whilst I do love chocolate cakes, I also like a range of other flavours too. But my son has multiple food allergies and part of a desensitisation program he needs to eat cake or biscuit with egg and butter in it three times a week. And because chocolate cake is his favouite and one he is guaranteed to eat, to tend to go for those. I have, however, really enjoyed making a variety of new recipes for him, and the last few have been stunningly delicious. I did substitute soya milk for the sour cream in the recipe, as my son can't have the cream.


This cake, has a whole zucchini in it - I still call it zucchini, as that's what we call it in Australia, but over here in the UK it is called courgette. I made sure to squeeze the excess juice out of it after I grated it. It's a very runny mixture anyway so I'm not sure if it matters that much, but worth doing anyway.


On the top is the most deliciously crunchy crust made from sugar and cinnamon...I just love it. Oh by the way, I halved the amount of crunchy topping you need, and even then I didn't use it all...worth noting.

So, have I tempted you yet? I hope so, this was such a quick and easy bake to make, and so deliciously moist and flavoursome. 
And the best bit? My son, who hates zucchini, said he absolutely LOVED this cake (I didn't tell him the secret ingredient!!)

You can find the recipe here:

Happy baking!
Kris x


Saturday, 25 July 2015

Raspberry Ripple and Pistachio Partfait


I subscribe to Delicious magazine and in the July issue they featured this parfait on the cover. It looked 'delicious', no actual pun intended!
Anyway as I browsed the mag and read this recipe I noticed they said you can cook the cover and enter the comp, so I thought, oh well, why not?
I have never even eaten, let alone made a parfait before, so I wasn't sure what to expect, but I can tell you now, it is one of the best desserts I have EVER eaten! Ever!

And it's incredibly easy to make....I kid you not!


When I put it on my Facebook page, a few people asked for the recipe, but I only had it in print form. Now it's been published online, I can share it with you easily.

I urge you to try it...you will not be disappointed - just be aware, it is not suitable for pregnant women as it involves a lot of raw egg.


Find the recipe here.

Enjoy...and thank me later, you will love it!

Kris x


Friday, 24 July 2015

Mojito Cupcakes - Guest Post from Jane Gage


Thank you so much for inviting me to be a guest on your page! 


I have totally fallen in love with MOJITO CUPCAKES ! I have adapted the Hummingbird recipe a little to my taste, by adding finely chopped fresh mint in the icing and also using more lemon & lime zest. They are so easy to make and they taste incredible. 

If you like mojitos, beware....they are simply too good! 

Mojito Cupcakes
Makes 12

Ingredients

For the cake
280g caster sugar
80g unsalted butter
240g plain flour
1/2 tsp salt
3 tsp baking powder
2 tsp grated lime zest
2 tsp grated lemon zest
2 tablespoons mint, finely chopped
2 large eggs
240ml milk
1 tsp vanilla extract

For the drizzle
60g caster sugar
200ml white rum

For the Frosting
160g unsalted butter, softened to room temperature
500g icing sugar, sifted
1/2 tsp lime zest
1/2 tsp lemon zest
40ml milk
40ml rum
1 tsp mint, very finely chopped


Method:
1. Preheat oven to 180 degrees C. In a saucepan, combine the white rum and sugar for the drizzle. Boil and reduce by half. Set aside to cool.
2. Beat together the flour, baking powder, butter, salt, lemon/lime zest, mint, and sugar until it forms a crumbly consistency.
3. Mix egg, milk and vanilla in a jug and then pour into the cake mixture, beating to form a smooth batter.
4. Pour into the cupcake cases until 2/3 full. Cook for 12-15 mins until light golden brown and spongy.
5. While the cakes are still warm, poke a hole or two in the top with a skewer, and spoon the drizzle mixture over into the holes - be careful not to get any on the cases. Leave cakes to cool completely.
6. To make the frosting, cream the butter and icing sugar, adding in the zest and mint. If the mixture is stiff, add the milk to soften it up. Add the rum slowly, to suit your tastes. Pipe over the cupcakes and garnish with a small spring of mint.


Thank you so much Jane! I've eaten a few of her Mojito Cakes and can attest to their utter deliciousness!


Saturday, 18 July 2015

Triple Layer Chocolate Cake


I was looking for a good chocolate cupcake recipe recently, and asked out on my facebook page if anyone could recommend one. I had quite a few choices but decided to go with one from my sister-in-law, Bec. It's one she uses all the time. I read through the recipe and decided to go for a whole cake rather than cupcakes - this recipe has a tag line saying it's 'the best chocolate cake recipe ever'. Okay. We shall see.


It was super easy to make, using normal ingredients you'll find in your cupboard and it's even DAIRY FREE!


I made some slight changes to it:

  • I used coconut milk from the carton (not can) instead of cow's milk - this was to cater to my allergic son (there is no coconut taste at all in the cake)
  • I left out the coffee - I'm one of those odd people who doesn't like coffee.
  • I put raspberry jam between the layers as I don't like too much buttercream.
  • And I cheated and used a tub of Betty Crocker's Chocolate Fudge buttercream, as it is dairy-free, really tasty and much nicer than making buttercream with dairy free 'butter'.
  • So, if dairy is not a problem for you, then follow the recipe as it is (It will probably be even nicer!)
  • I used 3 x 8 inch (20cm) pans, rather than the 2 x 9 inch in the recipe.
Is it the best chocolate cake ever, I'm not sure, but it is really, really nice. The texture is moist and soft, and it feels really luxurious.


You want the recipe, don't you?

Okay well, it's not mine, so I will send you directly over to the site. You'll also find at the bottom of the page a link to her cupcake recipe, but it looks to me like it is pretty much half of this recipe.

From: Add a Pinch:   Best Chocolate Cake (ever)


Enjoy! Kris x


Sunday, 12 July 2015

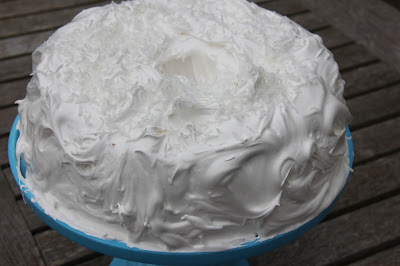
Coconut Angel Food Cake


I have been wanting to make an angel food cake for a while now and impulse purchased a Nordic Ware tin a couple of months ago. I had never even eaten one before, but really likes the lightness of how they looked.

Anyway, before you have a go yourself, and I hope you do, just know this cake itself takes 12 egg whites! I started by using Aldi's free range eggs, but their shells were so fragile, the separating was painfully tricky, so I switched to some Sainsbury's free range, and they were much for reliable. Of course if you have your own chickens, you'll have a ready supply.


The recipe I used for the cake can be found on the I am Baker website. I only had a few drops of coconut essence left so my cake was not as coconut-y as I would have liked, and I didn't put that cream coating on it either. I decided to add a marshmallow frosting that I have used before, with shredded coconut on top.


To make this cake, I assumed you needed the special angel food cake tin and I bought the one from Nordic Ware as it was recommended and comes in two parts. It's a nifty tin, as you need to invert the cake once it comes out of the oven, and it has three legs which means they support it fully while it cools. It was also easy to get out of the tin; I ran a palette knife around the edge and then on the base too.

So a couple of things to note when making this cake:

  • Do not grease the pan - at all.
  • Be careful when mixing to keep the egg whites full of air.
  • Add flavour to the mix if you want but be careful not to lose any of the air - the cake itself is not bursting with flavour - it has a very light, almost dry, spongey texture.
  • As soon as it comes out of the oven, invert it on the bench, the legs on this pan will support it - leave it upside down until completely cool.
  • Use a palette knife to loosen it from the edges before taking out of the pan.


Good luck and enjoy! K x